You may see this error show up when viewing your Swayze calendar or it may be reported by a contact or appointment setter. This can happen if a user isn't assigned to the calendar or out-of-office events are set in your Google Calendar. Use these steps to fix this issue:
A user needs to be assigned so that the system knows what availability to check.
1. Navigate to Calendar Settings via Settings > Calendars OR click Calendar Settings in the top menu when viewing a Calendar.
2. Click the menu button (3 dots) for the affected calendar.
3. Click Edit.
4. While on the Meeting Details tab, scroll down to Select team members.
5. Click to select the user for this calendar and then Save.
Out-of-office events could be blocking off all the slots on your calendar.
1. Log in to Google Calendar.
2. Check for any out-of-office event.
3. Delete the event and any future events.
This issue tends to present itself when an SMS/email is sent to a contact and mentions booking an appointment but there's no link in the message. The issue can happen if the custom value used for SMS/Email doesn't have a link to send. We use a funnel page link that hosts your calendar.
Ensure a domain is connected to all funnels related to your insurance type. You will need the correct link from the funnels. Open two tabs to make it easier: one for the custom values page and one for the funnel page.
Note: If you're part of a team in a subaccount and you have your own calendar, your setup may be different. Contact support for help.

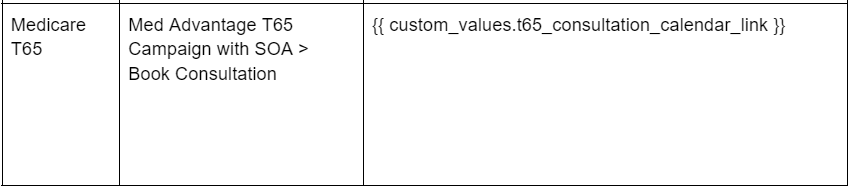
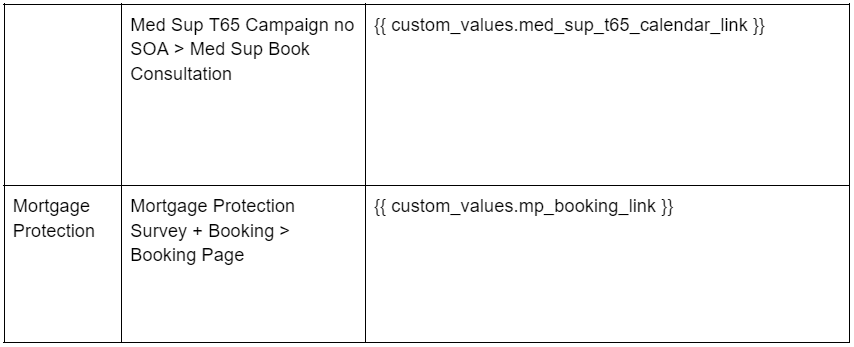
Use these steps to get the funnel page link:
1. Go to Sites & Forms > Funnels.
2. Find the correct Funnel and Funnel Step using the guide above.
3. Copy the URL for the Calendar or Booking Step of the funnel.
Use these steps to update the custom values:
1. Go to Settings > Custom Values.
2. Search for the custom value (see guide above) according to your insurance type.
3. Click the menu button (3 dots) for the custom value
4. Click Edit Custom Value.
5. Paste the link from the funnel step and click Save.
An empty space in place of where your calendar should be on the funnel booking page usually means your calendar isn't activated. Use the steps below to solve this issue:
1. Go to Calendar Settings via Settings > Calendars OR click Calendar Settings in the top menu when viewing a Calendar.
2. Click the menu button for the calendar.
3. Click Activate Calendar.
If you're getting a 404 error, your domain may not be connected to Swayze. Use these steps to ensure your domain is connected.
Not seeing confirmed appointments in Calendars usually happens when a user or calendars aren't selected. Follow the below steps to fix this.
1. In Calendars locate Users and Calendars under the mini calendar on the right.
2. Click Users and check off your user account and/or other user accounts you want to see appointments for.
3. Click Calendars and check off all calendars you'd like to see booked appointments for.
Appointments should now be visible on your calendar.
Note: If you can't check off a calendar in step 3 that may be because that calendar is drafted. You'll need to go into Calendar Settings and activate that calendar.
When appointments booked on Swayze don't sync to Google then it's usually because not all permissions are allowed, you have "do not add new events" checked/selected, or you may need to use a different Google account.
The linked calendar may not be selected or completely set up. Do not add new events may have been selected in its place.
1. Go to Settings > My Profile.
2. Scroll down to Calendar Configuration > Linked Calendar.
3. Click Edit for the affected account and ensure it's selected.
4. Save.
If the above steps doesn't help, you'll need to delete the calendar and re-integrate the account (Google or Outlook).
1. In My Profile, scroll to Calendar Settings > Connected Calendars.
2. Click the delete button for the affected calendar.
3. Click Add New.
4. Click Connect for either Google or Outlook. Sign into your account and allow all permissions.
5. Under Linked Calendar click the edit button for the new account.
6. Ensure the new account is checked/selected.
7. Click Save.
8. Scroll down to Conflict Calendars.
9. Click Add/Edit for the desired calendar.
10. Check off the other calendars you want to check for conflict and Save.
